
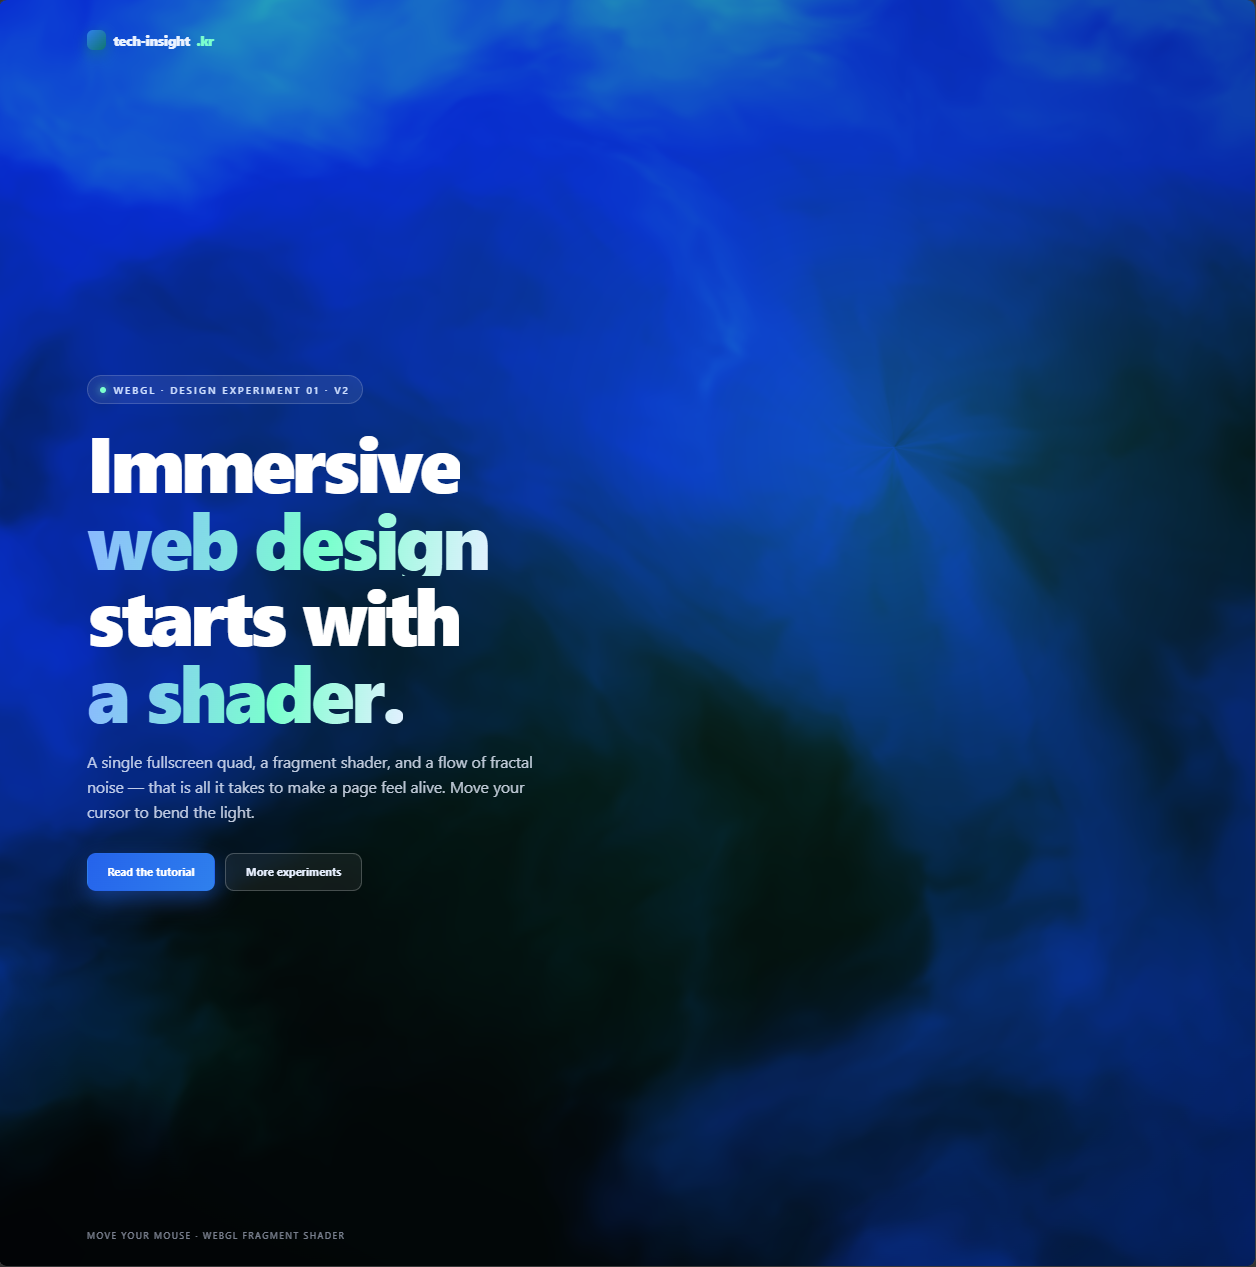
How to Build a WebGL Shader Background Hero, Step by Step (8-steps)
Focus keyword: webgl shader background
The sites that feel “alive” the moment they load—flowing gradients, light that bends under your cursor, headlines that assemble themselves—usually share one ingredient: a webgl shader background. In this tutorial you’ll build exactly that: a full-screen, cursor-reactive hero powered by a single fragment shader, using three.js and GSAP. But instead of dumping 300 lines of code on you, we’ll build it the way real design teams do, one stage at a time.
Here is the twist that makes this guide reusable: for every stage you’ll first see the example requirement you would hand a developer (or an AI), and then the result that requirement produces. By the end you’ll have a working immersive web design hero you can copy and run, plus a repeatable eight-stage brief you can point at any future effect. Everything below is plain code you can paste into one HTML file and open in a browser.
This is the real thing, running live. Move your cursor inside the frame to bend the light.
What Is a Requirements-First WebGL Shader Background?
A webgl shader background is a full-screen canvas whose every pixel is drawn on the GPU by a small program called a fragment shader. Because the GPU colors thousands of pixels in parallel, you can animate rich, liquid gradients at 60fps that plain CSS could never produce.
“Requirements-first” simply means we decide what the effect must do—its mood, its performance budget, its fallbacks—before writing a line of GLSL. That discipline is what separates a demo that only works on your laptop from production immersive web design. Common places this technique shows up:
- Landing-page heroes for product, agency and portfolio sites
- Ambient section backgrounds that react to scroll or cursor
- Loading screens and brand intros that need to feel premium
- Data or music visualizers driven by real-time input
Who This Tutorial Is For
- Front-end developers who want to ship an immersive hero without it tanking mobile performance
- Designers who code looking for a repeatable brief instead of copy-pasted shader snippets
- Anyone briefing an AI or a teammate who wants to hand over clear, stage-by-stage requirements
You need comfortable JavaScript fundamentals. No prior WebGL or GLSL experience is required—we introduce every piece as its stage arrives.
Technologies We’ll Use
For the latest official details, see three.js documentation.
For the latest official details, see WebGL API and GSAP documentation.
three.js – a thin, friendly layer over raw WebGL. We use it to create a renderer, a camera, and one full-screen plane whose material is our custom ShaderMaterial. three.js does the plumbing; the shader does the art.
GLSL fragment shader – the GPU program that colors each pixel. Ours builds a flowing gradient with fractal noise (fBm) and mixes brand colors along its crests.
GSAP – animates the DOM headline (not the shader). The 3D lives on the canvas; the text stays real HTML so it remains selectable and SEO-friendly.
Building It: The Eight-Stage Brief
Each stage below begins with the requirement you would write, then shows the result. Read the requirement first—that is the reusable part.
Stage 1 — Concept & Art Direction
Example requirement you give
“A hero that feels techy but premium. Reference the fluid motion of jitter.video. Brand colors: blue #2563eb, sky #2f80ed, teal #0f766e, on near-black. Headline: Immersive web design starts with a shader. The background should feel alive to signal ‘this is a technology site.’”
The result of Stage 1 is not code—it is a locked palette, one headline, and one word (“alive”) that every later decision must serve. Write it down; it is your tie-breaker for the rest of the build.
Stage 2 — Performance & Accessibility Budget
Example requirement you give
“Target 60fps, desktop-first but must work on phones. three.js and GSAP over CDN are fine. Headline text must stay real DOM for SEO. If WebGL is unavailable, degrade gracefully. Respect prefers-reduced-motion.”
This budget is the most valuable stage and the one most tutorials skip. It pre-decides four things we implement later: a pixel-ratio cap, a reduced-motion path, a no-WebGL fallback, and text-as-DOM. Deciding them now prevents a rewrite in Stage 6.
Stage 3 — Layer Separation
Example requirement you give
“Content layer (headline, subtext, buttons, logo) = real HTML on top. Decoration layer = the shader canvas behind it. Fade the shader darker under the text on the left so the copy stays readable.”
The result is a two-layer structure: a fixed full-screen <canvas> at z-index:0, and the hero content marked up as ordinary HTML above it. Readability is handled inside the shader with a horizontal fade, not with a heavy overlay.
<canvas id="gl"></canvas>                <!-- decoration, z-index:0 -->
<main class="hero">                     <!-- content, z-index:2 -->
  <h1>Immersive web design starts with a shader.</h1>
  <p class="lede">A single fullscreen quad, a fragment shader…</p>
  <a class="btn" href="#">Read the tutorial</a>
</main>
Stage 4 — Prototype the Core Effect
Example requirement you give
“Prove the single riskiest piece first: a domain-warped fractal-noise (fBm) flow field that mixes the brand colors and looks like slow-moving liquid. Done when the brand colors flow like water. Expose speed, noise scale and contrast as tunable values.”
First, the three.js scaffold: a renderer, an orthographic camera, and one plane that fills the screen. Passing values into the shader is done through uniforms.
import * as THREE from 'three';

const canvas   = document.getElementById('gl');
const renderer = new THREE.WebGLRenderer({ canvas, antialias: true, alpha: true });
renderer.setPixelRatio(Math.min(window.devicePixelRatio, 2));

const scene  = new THREE.Scene();
const camera = new THREE.OrthographicCamera(-1, 1, 1, -1, 0, 1);

const uniforms = {
  u_time:  { value: 0 },
  u_res:   { value: new THREE.Vector2() },
  u_mouse: { value: new THREE.Vector2(0.5, 0.5) },
};

const material = new THREE.ShaderMaterial({ uniforms, vertexShader, fragmentShader });
scene.add(new THREE.Mesh(new THREE.PlaneGeometry(2, 2), material));
The art lives in the fragment shader. Fractal Brownian motion (fBm) stacks several octaves of noise; feeding noise back into itself (“domain warping”) is what gives the liquid look.
float fbm(vec2 p){
  float v = 0.0, amp = 0.5;
  for (int i = 0; i < 6; i++) {   // 6 octaves of detail
    v += amp * noise(p);
    p *= 2.02;
    amp *= 0.5;
  }
  return v;
}

void main(){
  vec2 p = (vUv - 0.5);
  p.x *= u_res.x / u_res.y;         // aspect-correct
  float t = u_time * 0.06;          // speed (tunable)

  // domain warping: noise fed into noise = flow
  vec2 q = vec2(fbm(p * 1.6 + t), fbm(p * 1.6 - t + 5.2));
  vec2 r = vec2(fbm(p * 1.6 + q + t), fbm(p * 1.6 + q - t + 3.1));
  float f = fbm(p * 1.8 + r * 1.4 + t);

  // mix the brand palette along the flow
  vec3 col = u_deep;
  col = mix(col, u_teal, smoothstep(0.15, 0.65, f));
  col = mix(col, u_blue, smoothstep(0.35, 0.85, f + r.x * 0.4));
  col = mix(col, u_sky,  smoothstep(0.55, 0.95, r.y));

  // readability fade under the left-side copy (Stage 3)
  col *= mix(1.0, 0.68, smoothstep(0.0, 1.0, vUv.x * 0.6));
  gl_FragColor = vec4(col, 1.0);
}
Stage 5 — Wire Up the Interaction
Example requirement you give
“The cursor should pull the flow toward it with a soft glow. Motion must feel smooth and liquid, never twitchy—follow the mouse with easing, not one-to-one.”
The key detail is the last line: never feed raw input straight into the shader. Store a target, then lerp a smoothed value toward it each frame. That single easing step is what reads as “premium.”
window.addEventListener('pointermove', e => {
  uniforms.u_mouse.value.set(
    e.clientX / innerWidth,
    1 - e.clientY / innerHeight
  );
});

// inside the render loop — smooth, liquid follow
uniforms.u_mouseS.value.lerp(uniforms.u_mouse.value, 0.06);
Stage 6 — Optimize
Example requirement you give
“Stop rendering when the tab is hidden or the canvas scrolls offscreen. Cap pixel ratio (desktop 2, mobile 1.5) and drop to 4 noise octaves on phones. Pausing must never make the animation jump when it resumes.”
A shader that runs full-tilt in a background tab drains batteries and gets your site flagged. Gate the loop behind the Page Visibility API and an IntersectionObserver, and accumulate time from a clamped frame delta so a pause never causes a jump.
const isMobile = matchMedia('(max-width: 768px)').matches;
const OCTAVES  = isMobile ? 4 : 6;              // cheaper noise on phones
renderer.setPixelRatio(Math.min(devicePixelRatio, isMobile ? 1.5 : 2));

let running = false, rafId = null, last = 0, uTime = 0;

function frame(now){
  const dt = Math.min((now - last) / 1000, 0.05); // clamp = no jump after a pause
  last = now; uTime += dt;
  uniforms.u_time.value = uTime;
  uniforms.u_mouseS.value.lerp(uniforms.u_mouse.value, 0.06);
  renderer.render(scene, camera);
  if (running) rafId = requestAnimationFrame(frame);
}
function play(){ if (running) return; running = true; last = performance.now(); rafId = requestAnimationFrame(frame); }
function pause(){ running = false; cancelAnimationFrame(rafId); }

document.addEventListener('visibilitychange', () => document.hidden ? pause() : play());
new IntersectionObserver(([e]) => e.isIntersecting ? play() : pause()).observe(canvas);
Stage 7 — Accessibility & Fallbacks
Example requirement you give
“If the user asked for reduced motion, render one static frame and skip the intro animation. If WebGL fails, show a static brand gradient instead of a blank page. Keyboard focus on buttons must be visible. Mark the canvas decorative.”
Two small paths satisfy every requirement above. The reduced-motion check draws a single frame; the fallback is pure CSS on the <body>, sitting behind the (possibly failed) canvas.
const reduceMotion = matchMedia('(prefers-reduced-motion: reduce)').matches;

if (reduceMotion) {
  renderer.render(scene, camera);   // one static frame, no loop, no GSAP intro
} else {
  play();
}

/* CSS: static brand gradient BEHIND the canvas = no-WebGL fallback */
/* body { background: linear-gradient(135deg, #0b1220, #0f172a, #0b2036); } */
/* a:focus-visible { outline: 2px solid #7bffce; outline-offset: 4px; } */
/* <canvas id="gl" aria-hidden="true"> */
Stage 8 — Ship & Measure
Example requirement you give
“Deliver as one self-contained HTML file. Verify on a local server and on a real phone. Check FPS and Lighthouse, then tune intensity down if needed.”
Serve the file (a shader loaded over file:// can hit module restrictions), open it on a phone, and watch the frame rate. Shipping is not the end—measuring on real hardware is what tells you whether to dial the effect back.
Requirements-First vs. Code-First
If you had jumped straight into shader code, Stages 6 and 7 would have been afterthoughts—the exact things that make a webgl shader background fail review. Writing the requirement first turns each stage into a checklist you can audit against later. Just as important: not every immersive site needs full WebGL. A restrained, typography-led page can feel every bit as premium, so let Stage 1 decide whether you even reach for a shader.
Common Issues and Solutions
The canvas is blank at load. three.js is imported as an ES module from a CDN, so it arrives asynchronously; make sure your first resize() runs after the module loads, and call it once before the loop starts.
The animation jumps after switching tabs. You are advancing time with a raw timestamp. Accumulate from a clamped delta (Math.min(dt, 0.05)) and reset last on resume, as in Stage 6.
It runs hot on phones. Lower the pixel-ratio cap, cut fBm octaves, and reduce the render resolution. GLSL loops need a constant bound, so bake the octave count into the shader string per device rather than passing it as a uniform.
Extending Your Hero
- Drive the shader with scroll position instead of the cursor for a scrollytelling section
- Feed audio amplitude into a uniform for a music-reactive background
- Swap the fBm gradient for a glTF 3D model to build a product viewer
- Port the renderer to WebGPU (via three.js
WebGPURenderer) with a WebGL fallback
Frequently Asked Questions
Do I need to know WebGL to build a webgl shader background?
No. three.js hides the boilerplate, and you only write a short fragment shader. Start by tuning the numbers in the fBm and color-mix lines—you will learn GLSL by feel.
Will a shader background hurt my SEO or accessibility?
Not if you keep text as real DOM (Stage 3), respect reduced motion, and provide a fallback (Stage 7). The canvas is decorative and marked aria-hidden.
Is WebGPU ready to replace WebGL?
Support has grown, but you still need a WebGL fallback in 2026. three.js lets you target both, so build in WebGL now and switch renderers when your analytics say it is safe.
Next Steps
- Reuse the eight-stage brief for your next effect—kinetic typography or scroll animation
- Read the three.js and GSAP docs linked above to go deeper
- Profile on a mid-range phone and tune the intensity to your budget
Build it once and the payoff compounds: you now own both a reusable webgl shader background and, more valuably, a requirements-first process that turns any ambitious immersive web design idea into a shippable, accessible, measurable result—instead of a demo that only ever ran on your machine.
Enjoyed this article?