
Messages API Tutorial: A Beginner’s Guide to Request and Response Basics
Focus keyword: Messages API tutorial
If you’ve ever wondered how apps send you SMS notifications, verification codes, or chat messages, the answer is a Messages API. In this Messages API tutorial, you’ll learn what these APIs are, how the request/response cycle works, and most importantly—how to send your first message successfully, even if you’ve never made an API call before.
By the end of this guide, you’ll understand API request response fundamentals and have the practical knowledge to start building your own messaging workflows.
Previous tutorial :
Tutorial 1 : Getting Started with Claude – Understanding Models & Pricing
Tutorial 2 : Building Development Environment with CLI & SDKs
What is a Messages API?
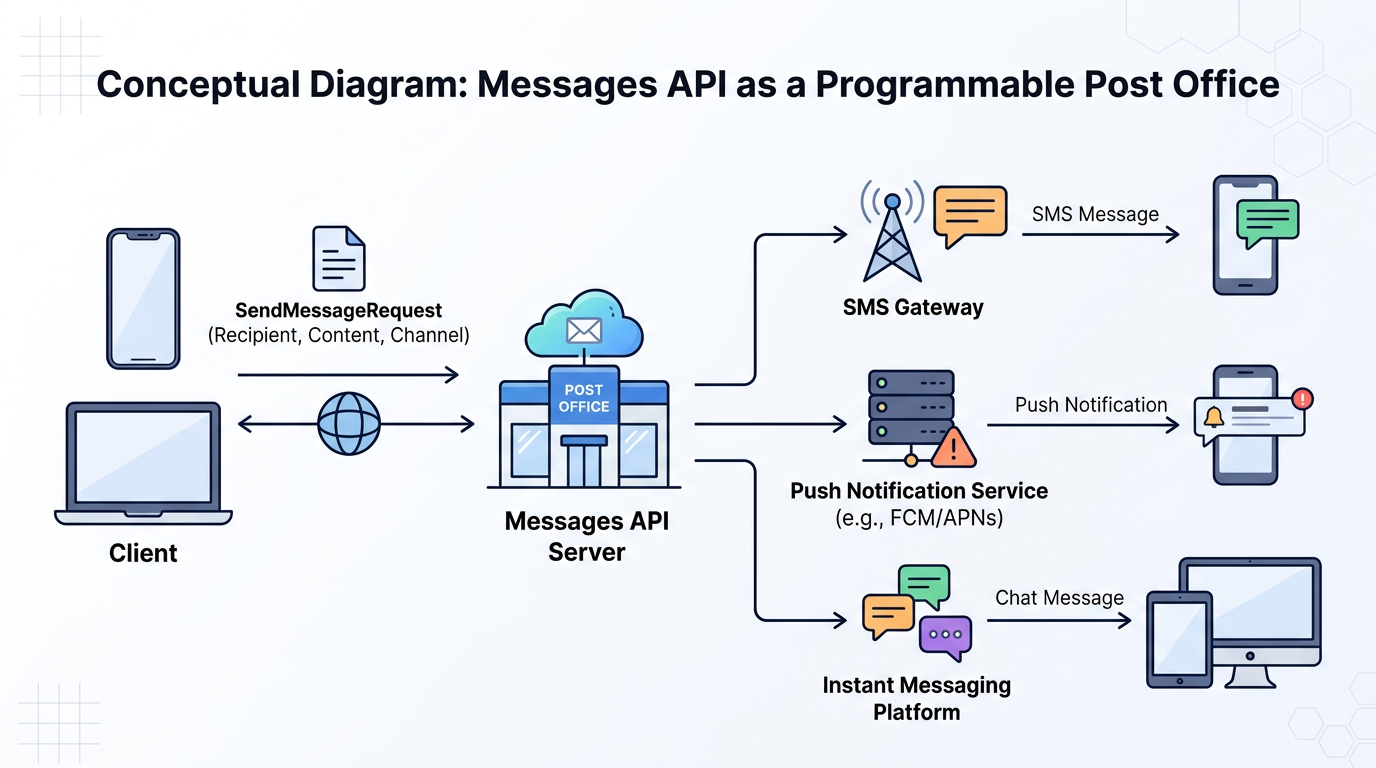
A Messages API is a specific type of API designed to send and receive messages programmatically. Unlike general data APIs that might fetch database records or process payments, messaging APIs specialize in communication—sending SMS texts, push notifications, in-app messages, or chat platform messages.
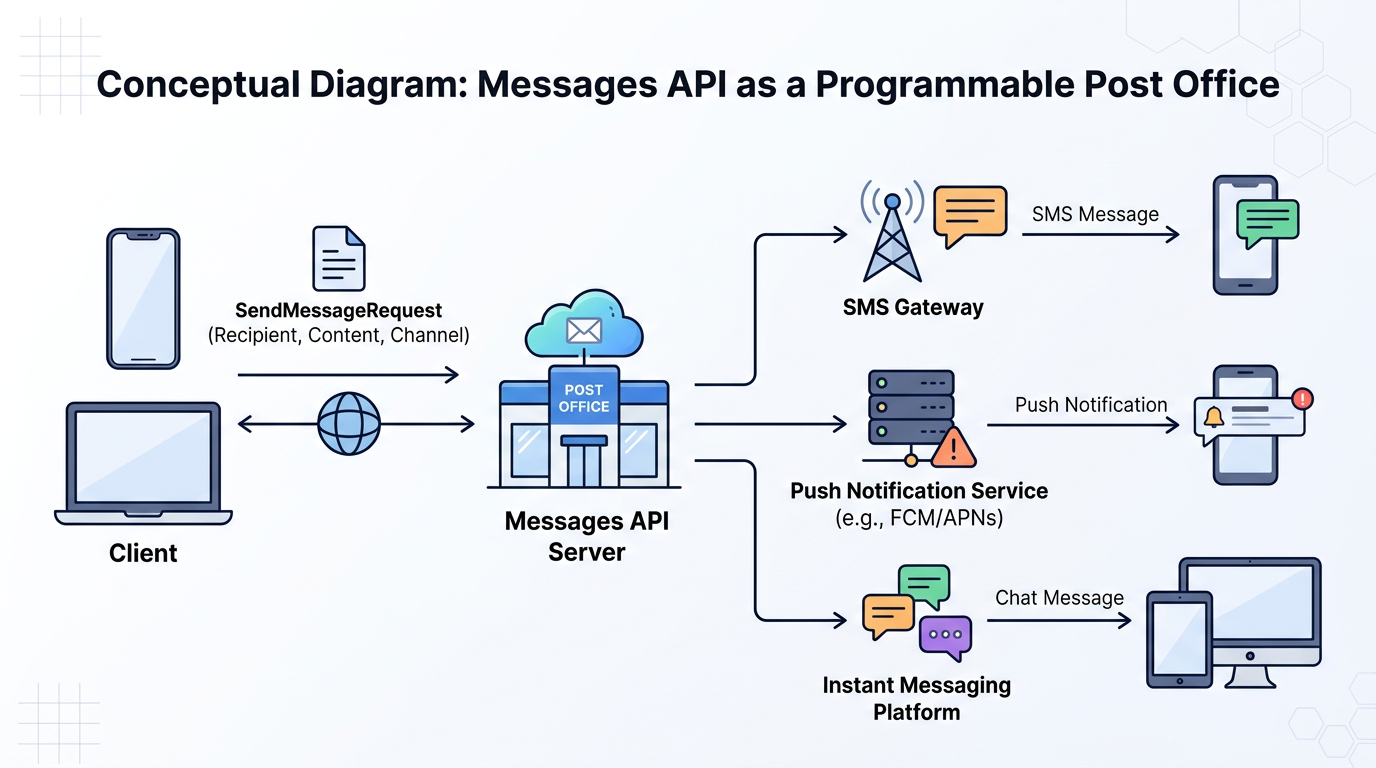
Think of it as a programmable post office: you hand over your message details (who to send it to, what to say), and the API handles the delivery infrastructure, routing, and confirmation.
Common messaging API use cases include:
- Sending one-time password (OTP) codes during user signup
- Delivering order confirmation texts to customers
- Triggering alert notifications based on system events
- Building chatbot responses
- Automating customer support messages
Messages APIs abstract away the complexity of carrier networks, protocols, and delivery tracking—you just make structured requests and read the responses.
Who This Messages API Tutorial Is For
This tutorial is designed for:
- Developers learning API integration for the first time
- No-code builders exploring automation workflows with tools like n8n
- Tech-savvy beginners who want to understand API basics for beginners before building projects
- Anyone who needs to send automated messages but isn’t sure where to start
You don’t need to be a programmer, but basic familiarity with concepts like URLs and JSON formatting will help. We’ll define technical terms as we go.
Understanding API Request and Response Basics
For the latest official details, see API request response fundamentals.
Before diving into a beginner messaging API example, let’s clarify what happens when you use an API.
The Request/Response Model
Every API interaction follows a simple pattern:
- You (the client) send a request to the API server with specific instructions
- The server processes your request (validates it, performs the action)
- The server sends back a response telling you what happened
It’s like ordering at a restaurant: you tell the waiter what you want (request), the kitchen prepares it, and the waiter brings back your food or tells you it’s unavailable (response).
What’s in a Request?
An API request for sending messages typically includes:
- HTTP Method: The action type (usually POST for sending messages, GET for retrieving status)
- Endpoint URL: The specific web address where your request goes
- Headers: Metadata about your request (authentication credentials, content format)
- Body/Payload: The actual message data (recipient, message text, sender ID)
What’s in a Response?
The API response contains:
- Status Code: A number indicating success (like 200 or 201) or failure (like 400 or 401)
- Response Headers: Metadata from the server
- Response Body: Details about what happened (message ID, timestamp, error information)
Understanding this cycle is fundamental to how to use messages API services effectively.
Prerequisites: What You Need Before Starting
To follow this tutorial, you’ll need:
- A messaging API account: We’ll use Twilio as our example because it offers trial credits for testing. Alternative providers include Vonage, MessageBird, and AWS SNS, but the core concepts apply to all.
- API credentials: After signing up, you’ll receive an Account SID and Auth Token. These act as your username and password for API requests. Check your provider’s dashboard for these credentials—Twilio displays them prominently on the console home page.
- A testing tool: Choose one of these options:
- Postman (beginner-friendly GUI tool for building API requests)
- cURL (command-line tool, usually pre-installed on Mac/Linux, available on modern Windows)
- A verified phone number: Trial accounts typically require you to verify your own phone number before you can send test messages to it.
Important security note: Never share your API credentials publicly or commit them to version control systems like Git. Treat them like passwords.
Before following specific setup steps, check the latest official documentation from your chosen provider, as account creation flows and interface details change over time.
Step-by-Step: Send Your First Message
Here’s a practical walkthrough of sending an SMS message. We’ll break down each component so you understand what’s happening.
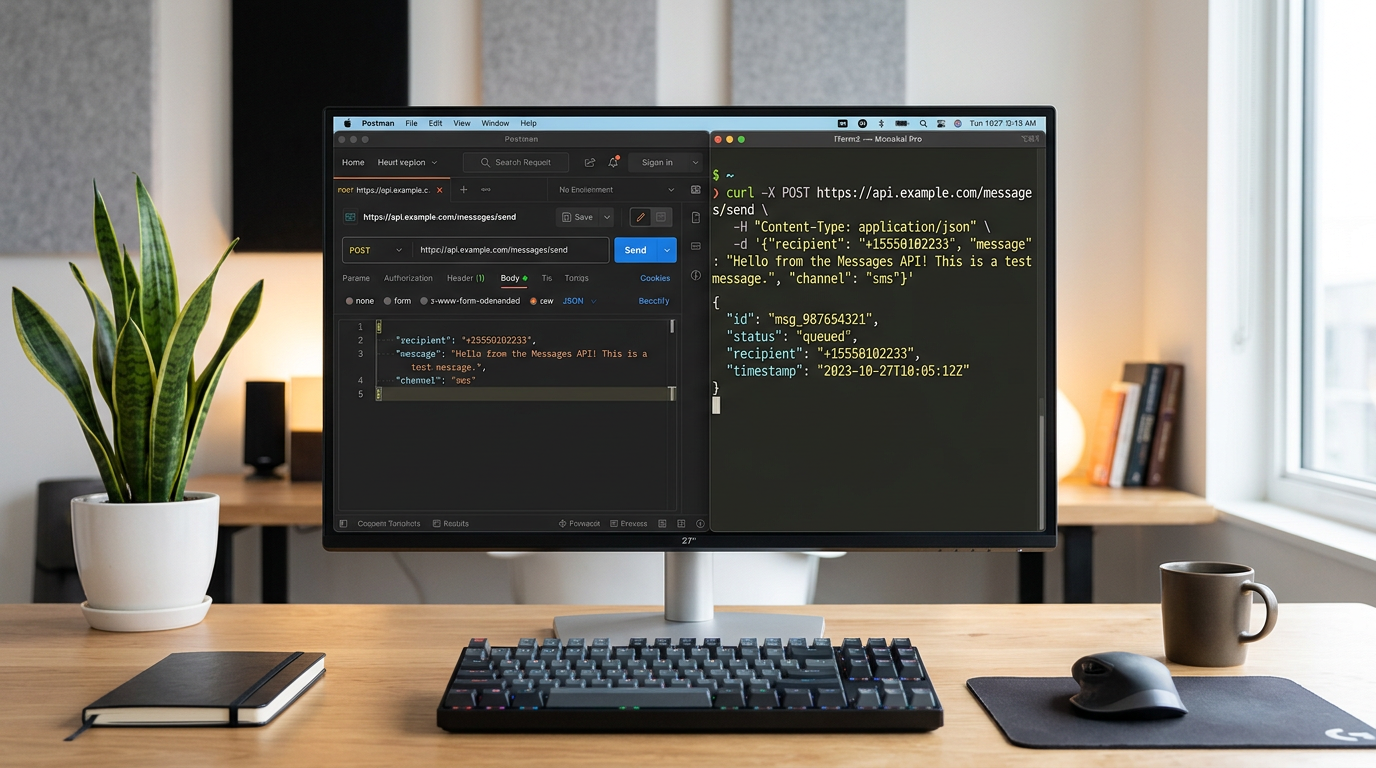
Step 1: Set Up Your Request
For this example, we’ll construct a POST request to send an SMS. The general structure looks like this:
HTTP Method: POST Endpoint structure: Your provider’s base URL + account-specific path + messages endpoint
Most messaging APIs use a URL pattern similar to: https://api.provider.com/accounts/{YourAccountID}/messages
Step 2: Add Authentication Headers
Your request needs to prove you’re authorized. Most providers use HTTP Basic Authentication:
Header name: Authorization Header format: Base64-encoded credentials or Bearer token (check your provider’s authentication docs)
You’ll also need to specify content type:
Header name: Content-Type Header value: application/x-www-form-urlencoded or application/json (depends on your provider)
Step 3: Build Your Message Payload
The request body contains your message details. Here’s what a typical JSON payload looks like:
{
  "To": "+15551234567",
  "From": "+15559876543",
  "Body": "Hello! This is your first API message."
}
Required fields typically include:
- To: Recipient’s phone number (include country code, e.g., +1 for US)
- From: Your sending number (provided by your messaging service)
- Body: The message text (usually 160 characters for single SMS)
Step 4: Send the Request
Using Postman:
- Create a new request
- Set method to POST
- Enter the full endpoint URL
- Add headers in the Headers tab
- Add your JSON body in the Body tab (select “raw” and “JSON” format)
- Click Send
Using cURL (example structure):
curl -X POST https://api.provider.com/accounts/ACCOUNT_ID/messages \
  -H "Authorization: Bearer YOUR_AUTH_TOKEN" \
  -H "Content-Type: application/json" \
  -d '{"To":"+15551234567","From":"+15559876543","Body":"Hello!"}'
Before running any command, replace placeholder values with your actual credentials from your provider’s dashboard.
Step 5: Read the Response
A successful response typically returns a 201 Created status code and JSON with details:
{
  "sid": "SM1234567890abcdef",
  "status": "queued",
  "to": "+15551234567",
  "from": "+15559876543",
  "body": "Hello! This is your first API message.",
  "date_created": "2026-07-24T10:30:00Z"
}
Key fields to understand:
- sid or message_id: Unique identifier for tracking this message
- status: Current state (queued, sent, delivered, failed)
- date_created: Timestamp for your records
This response confirms your message is in the system and being processed.
Common Mistakes and How to Fix Them
Error 401: Unauthorized
Symptom: Response says “Authentication failed” or “Invalid credentials”
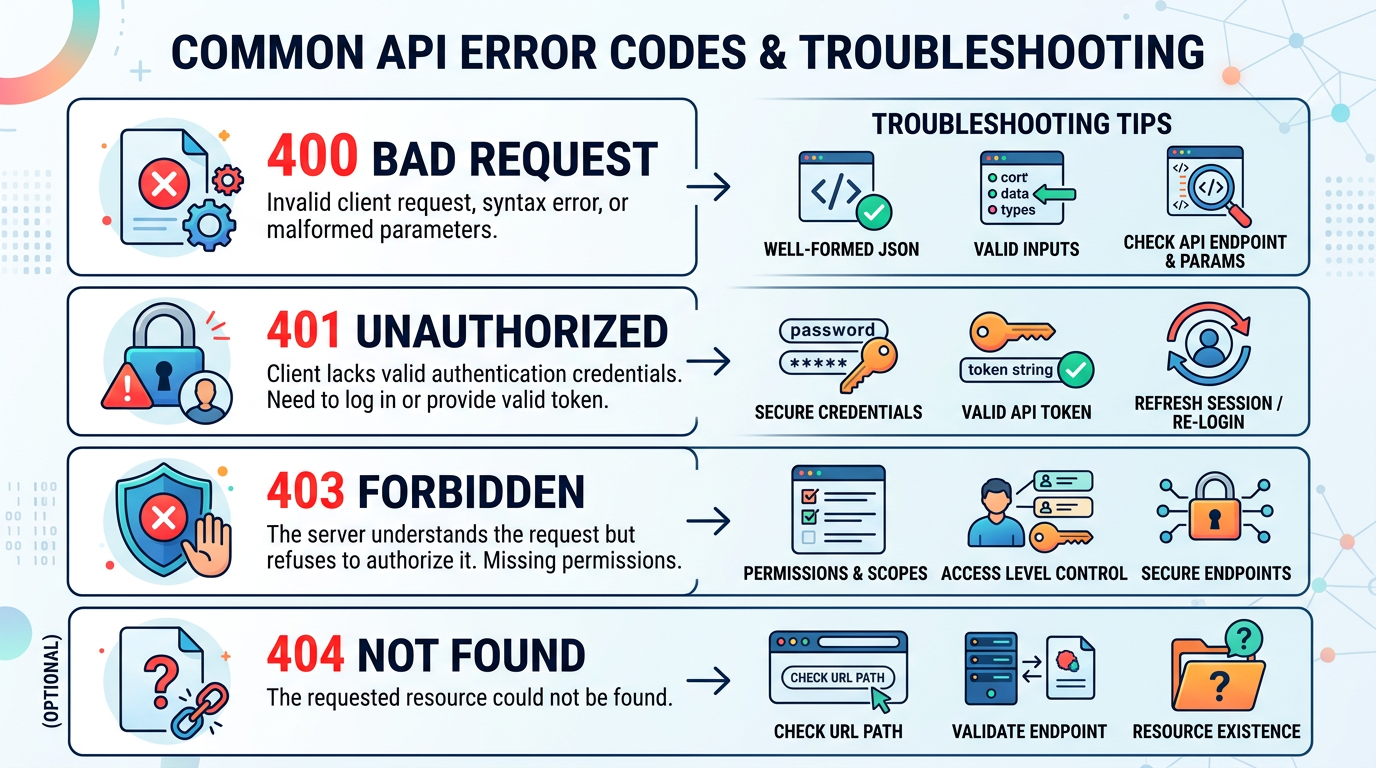
Fix: Double-check that you copied your Account SID and Auth Token correctly from your provider’s dashboard. Verify you’re using the correct authentication header format specified in the official API reference.
Error 400: Bad Request
Symptom: Response says “Missing required parameter” or “Invalid phone number format”
Fix: Verify all required fields are present in your request body. Phone numbers must include country codes (e.g., +1 for US numbers) and use the E.164 format. Check for typos in field names—many APIs are case-sensitive.
Error 403: Forbidden
Symptom: “Account not authorized” or “Number not verified”
Fix: With trial accounts, you can usually only send messages to phone numbers you’ve verified in your account settings. Go to your provider’s console and add your recipient number to the verified list.
Malformed JSON
Symptom: Parser errors or “Invalid request body”
Fix: Validate your JSON syntax using a JSON validator tool. Common issues include missing quotes, trailing commas, or incorrect nesting. In Postman, syntax highlighting helps catch these errors.
No Response Received
Symptom: Request hangs or times out
Fix: Check your internet connection and verify the endpoint URL is correct. Ensure you’re using HTTPS (not HTTP) if required by your provider.
Understanding Response Status Codes
HTTP status codes tell you what happened. Here are the most common:
Success codes:
- 200 OK: Request succeeded (used for GET requests)
- 201 Created: Resource created successfully (common for message sends)
Client error codes:
- 400 Bad Request: Your request has invalid syntax or missing fields
- 401 Unauthorized: Authentication failed or missing
- 403 Forbidden: You’re authenticated but not allowed to perform this action
- 429 Too Many Requests: You’ve hit rate limits
Server error codes:
- 500 Internal Server Error: Problem on the provider’s side
- 503 Service Unavailable: Service temporarily down
When you receive an error, read the response body carefully—most providers include helpful error messages explaining exactly what went wrong.
Next Steps: Messages API Automation
Now that you understand the API request response fundamentals, you can build on this knowledge:
Integrate with workflow automation tools: Services like n8n let you trigger messages based on events (form submissions, database changes, scheduled times) without writing code.
Build authentication systems: Use messaging APIs to send verification codes during user signup or password reset flows.
Create notification systems: Automatically alert users when orders ship, appointments approach, or system issues occur.
Explore advanced features: Many messaging APIs support delivery receipts, multimedia messages (MMS), message scheduling, and two-way conversations.
The request/response pattern you learned here applies to nearly all REST APIs, so this knowledge transfers beyond just messaging. As you get comfortable, explore webhooks (where the API sends requests to you when events happen) and more complex messages API automation workflows.
Frequently Asked Questions
Do I need to know programming to use a Messages API? No. Tools like Postman provide graphical interfaces for making API calls, and no-code automation platforms like n8n can handle API integration through visual workflows. However, understanding basic API concepts helps you use these tools effectively.
How much does it cost to send messages? Most providers charge per message sent, with prices varying by destination country. Many offer trial credits for testing. Check your provider’s pricing page for current rates and trial limitations, as these change over time.
Can I send messages to any phone number? With production accounts, yes (with geographic variations). Trial accounts usually restrict you to verified numbers only. Some countries have regulatory restrictions on automated messaging, so capabilities vary by region.
What’s the difference between GET and POST for messaging APIs? POST sends new messages (creates a resource). GET retrieves information about messages you’ve already sent (reads a resource). You’ll use POST for most messaging actions and GET when you want to check message status or retrieve history.
Are my API credentials secure? Your credentials are as secure as you keep them. Never share them publicly, embed them directly in client-side code, or commit them to public repositories. Use environment variables or secure credential management systems in production applications.
Conclusion
You’ve now learned the essential Messages API tutorial concepts: what messaging APIs are, how the request/response cycle works, and how to send your first message using real API tools. The pattern of crafting a request with proper authentication, headers, and payload, then interpreting the response status and data, applies to virtually all REST APIs you’ll encounter.
Start experimenting with your trial account, try different message content, and explore your provider’s official API reference to discover additional capabilities. As you grow comfortable with these API basics for beginners, you’ll be ready to integrate messaging into automation workflows, applications, and notification systems.
The next step is practicing until the request/response flow becomes second nature—then you can focus on building the creative messaging solutions your projects need.
Enjoyed this article?