
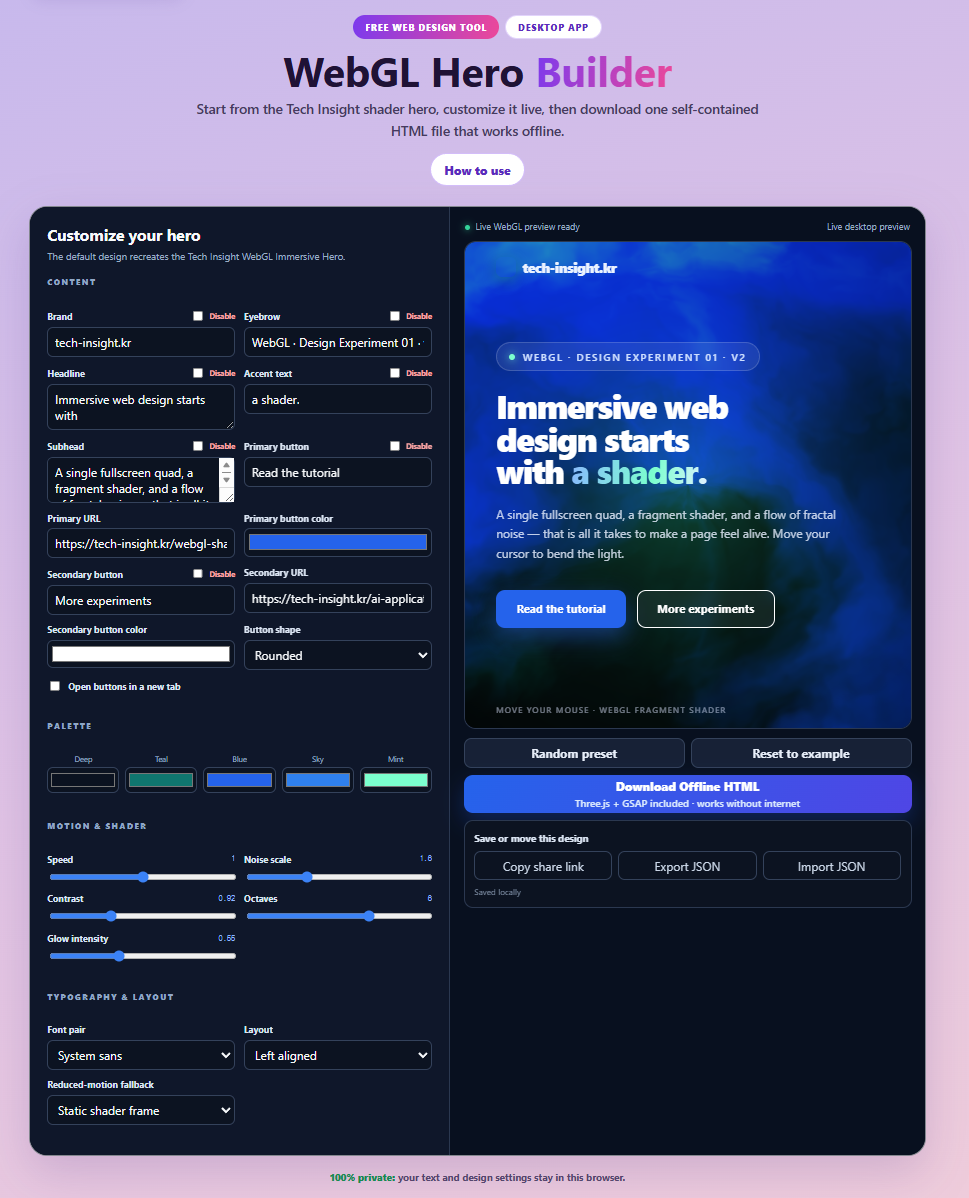
WebGL Hero Builder: Create an Interactive Website Hero Without Coding
Focus keyword: WebGL hero builder
A modern website hero should do more than display a headline and a button. It should create an immediate visual impression, communicate the identity of the site, and guide visitors toward the next action.
The problem is that building an interactive WebGL hero normally requires knowledge of JavaScript, three.js, GLSL shaders, animation loops, responsive design, and performance optimization. The WebGL hero builder removes most of that complexity.
It lets you customize an animated WebGL hero through visual controls, see every change in a live desktop preview, and download the finished design as a self-contained HTML file. You can change the text, colors, animation speed, shader appearance, typography, layout, and buttons without modifying the underlying shader code.
The application runs entirely in your browser. Your text and design settings are not uploaded to a server. By the end of this guide, you will know how to customize the default Tech Insight example, preview cursor interactions, hide content you do not need, save your settings, and download a complete HTML file that works offline.
Completed Application
Open the completed application and follow this guide in a separate browser tab:
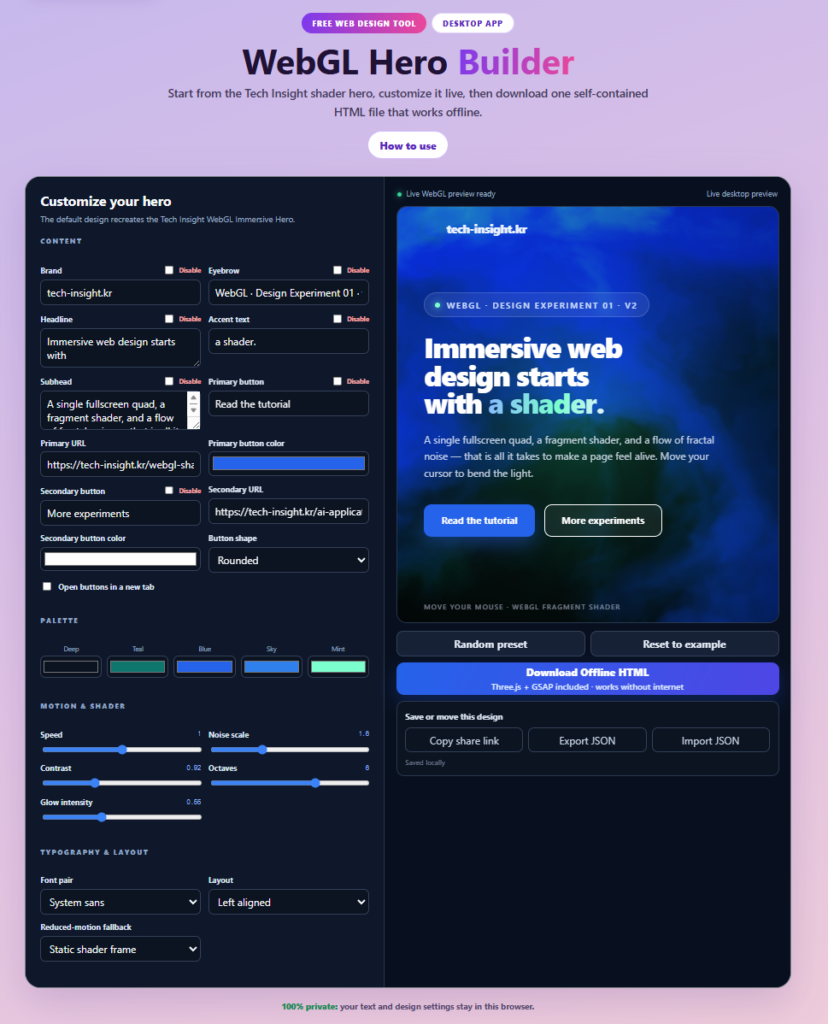
Desktop application
The Builder is designed primarily for desktop use. A larger screen provides enough room to keep the controls and interactive preview visible together.
What Is a WebGL Hero Builder?
A WebGL hero builder is a visual tool for creating an interactive website hero powered by WebGL. A hero section is the large introductory area that usually appears at the top of a landing page. It commonly contains a brand name, headline, description, and one or more call-to-action buttons.
Unlike a static hero image, a WebGL hero can respond to time, cursor movement, and animation settings. This creates a more immersive first impression without requiring a large background video.
The Tech Insight WebGL Hero Builder combines three parts:
- A control panel for editing the design
- A live preview that displays the real animated result
- An offline HTML exporter that packages the current design into one file
The default design recreates the visual direction of the Tech Insight WebGL Immersive Hero. You can use that completed example as a starting point instead of designing from an empty screen.
Who This Tool Is For
- Website owners who want an animated landing-page hero
- Designers who want to experiment with interactive backgrounds
- WordPress users who need a reusable HTML design
- No-code creators who are comfortable embedding an HTML file
- Developers who want a quick WebGL prototype
- Bloggers creating interactive demonstrations or product pages
You do not need to understand shader programming to use the Builder. If you want to learn how the underlying shader works, read the separate WebGL Shader Background Tutorial. That article explains the coding process, while this guide focuses on using the finished visual tool.
Before You Start
For the best editing experience, use a modern desktop browser and open the Builder in a full-size window. The interface contains two main areas:
- The left side contains the design controls.
- The right side contains the live desktop preview.
Move your cursor inside the preview to see the shader respond. Changing a control should update the preview without requiring a page reload. The downloaded result may also be viewed on smaller screens, but you should always test it on the actual website where it will be used.
How to Use the WebGL Hero Builder
The workflow is straightforward: start with the default example, customize one group of settings at a time, test the live result, save the configuration, and download the finished HTML file.
Step 1 — Start with the Default Example
When the WebGL hero builder opens, it loads a completed example instead of an empty design. The example gives you a working combination of brand text, an eyebrow, a headline, supporting copy, two buttons, five shader colors, motion settings, typography, and layout options.
Start by moving the cursor over the preview. The background should react to the cursor position while the visual texture continues to animate. Then change one setting at a time and observe the result.
Step 2 — Customize the Hero Content
The Content section controls the text and navigation elements displayed over the WebGL background.
Brand
The Brand field displays a small identity or website name in the hero. Replace the default value with a company name, product name, personal portfolio, or campaign title.
Eyebrow
The eyebrow is the small line above the main headline. It works well for product categories, article series, release labels, short project descriptions, or event information. Keep it brief so it does not compete with the headline.
Headline and accent text
The main message is separated into a headline and accent text, allowing part of the sentence to receive a different visual treatment.
Headline: Immersive web design starts with
Accent text: a shader.
Together, these create one complete statement while emphasizing the final phrase. Short headlines generally work better because they leave more space for the animated background.
Subhead
Use the subhead to explain what the product does, who it is for, what the visitor can expect, or why the page is useful. Two or three short lines are usually enough.
Step 3 — Customize the Buttons
The hero supports primary and secondary call-to-action buttons. Each button has settings for its visible text, destination URL, colors, and appearance.
Possible primary button labels include:
- Start building
- View the project
- Read the tutorial
- Download now
The secondary button should represent a lower-priority action, such as Learn more, View examples, More experiments, or Read the documentation. Enter a complete URL when linking to another page:
https://example.com/page/Test both buttons inside the downloaded file before publishing it.
Step 4 — Hide Content You Do Not Need
Each supported content element includes a disable option. Select it when you do not want that element to appear in the final hero.
This is useful when creating:
- A hero without a brand label
- A minimal headline-only design
- A page with only one button
- A decorative background without navigation
- A presentation-style landing page
Disabling an item removes it from the preview, helping you evaluate the final composition immediately.
Step 5 — Choose a Color Palette
The Palette section controls five colors used by the animated shader:
- Deep
- Teal
- Blue
- Sky
- Mint
These colors work together instead of acting as separate flat background colors. Changing one value can affect the balance, depth, and contrast of the entire animation.
Palette guideline
Choose a dark foundation for Deep, add one or two saturated mid-tones, and reserve the brightest color for highlights. A mixture of dark, mid-tone, and highlight colors usually produces more visual depth than five equally bright colors.
You can create dark blue and cyan for a technology brand, purple and pink for a creative portfolio, black and orange for a launch, or muted neutral tones for an editorial site. Check headline and button readability after every major change.
Step 6 — Adjust Motion and Shader Appearance
Speed
Speed controls the overall pace of the animation. Lower values produce a calmer background, while higher values create a more energetic effect. The animation should support the content rather than distract from it.
Noise scale
Noise scale changes the apparent size and frequency of the shader forms. Lower values can create larger, smoother areas. Higher values can create more detailed or tightly packed patterns.
Contrast
Contrast controls the separation between darker and brighter regions. Higher contrast can make the design more dramatic, but it may also reduce text readability.
Octaves
Octaves affect the amount of visual detail in the noise pattern. More octaves can produce a richer texture but may require more graphics processing. Use the lowest value that still gives you the detail you need.
Glow intensity
Glow intensity controls the strength of the brighter color regions. A subtle glow usually works well behind text. A stronger glow can suit experimental designs if it does not overpower the content.
Step 7 — Select Typography and Layout
Font pair
Choose a font combination that matches the character of the project. A neutral system font works well for applications, technology products, and minimal landing pages. A more editorial combination can make the hero feel closer to a magazine, studio, or portfolio.
Layout
A left-aligned layout is generally effective for product pages and articles. A centered layout can create a stronger poster-like composition. Check line length, button placement, empty space, and the position of bright background areas after changing it.
Reduced-motion fallback
Some visitors prefer reduced animation through their operating-system or browser settings. The reduced-motion fallback determines what they see instead of the full animated experience. A static shader frame preserves the design direction while respecting that preference.
Step 8 — Test the Live Preview
The preview is not just a decorative mockup. It represents the actual hero design and its interactive behavior. Before downloading, test the following:
- Move the cursor slowly and quickly from one side to the other.
- Change every text field and button label.
- Disable and re-enable content elements.
- Change all five palette colors.
- Test low and high motion values.
- Switch the font pair and layout.
- Confirm that the text stays readable over bright regions.
The cursor movement and shader response should feel connected. If the motion is too aggressive, reduce the speed, glow, or contrast.
Step 9 — Explore with Random Preset or Reset
Random preset
Random Preset applies a prepared combination of colors, motion, typography, and layout values. Use it when you need inspiration or want to compare different visual directions. Once you find a useful starting point, refine the individual controls.
Reset to example
Reset to Example restores the original Tech Insight configuration. Save or export your current settings first if you may want to return to them.
Step 10 — Save or Move Your Design
The Builder provides browser-based options for preserving or transferring your settings. You can save the design in the current browser, copy a share link, export the settings as JSON, or import a previously exported JSON file.
The JSON file and HTML file serve different purposes. JSON preserves the editable configuration. HTML is the completed website output.
Recommended backup workflow
- Finish the initial design.
- Export a JSON backup.
- Download the offline HTML file.
- Test the HTML file.
- Keep the JSON file for future revisions.
Step 11 — Download the Offline HTML File
When you are satisfied with the result, select Download Offline HTML. The Builder generates a self-contained .html file based on the current settings. Its required visual dependencies are included so the hero can run without an internet connection.
Test the download before publishing:
- Locate and open the downloaded HTML file.
- Confirm that the shader animates.
- Move the cursor over the page.
- Test the buttons.
- Resize the browser window.
- Disconnect from the internet and reload the file.
The downloaded result should match the design shown in the preview. This “what you see is what you download” behavior means you do not need to reconstruct the design after leaving the Builder.
Why Use an Offline HTML Export?
Many online design tools produce code that remains dependent on their hosting platform or an external runtime. An offline HTML export gives you direct control of the result.
- The design is not tied to an account.
- It can be stored as a normal file.
- It can be tested locally.
- It can be hosted on your own server.
- It does not require an API key.
- It continues to work without the Builder.
- It can be backed up with the rest of your website.
The exported file is useful for prototypes, digital portfolios, campaign pages, exhibitions, and interactive demonstrations. Part 2 of this series will explain how to add it to WordPress and other websites.
Privacy and Local Processing
The application is designed as a client-side tool. Your headlines, URLs, colors, and design settings are processed inside your browser rather than being uploaded for server-side rendering.
This is useful when experimenting with unpublished product names, draft campaign messages, internal prototypes, client concepts, or private destination URLs. As with any downloadable website file, inspect and test the final result before using it in production.
Common Issues and Solutions
The preview is not moving.
Move the cursor directly inside the preview. If it remains static, check whether reduced motion is enabled, confirm that browser graphics acceleration is available, reload the Builder, or try a current desktop browser.
The animation feels too strong.
Reduce the speed, contrast, glow intensity, noise scale, or octaves. Darker palette colors can also make the composition feel calmer.
The text is difficult to read.
Darken the Deep color, reduce glow intensity, lower contrast, shorten the headline, adjust the layout, or change the button colors. Readability should take priority over animation detail.
A button does not work.
Check that its URL starts with https:// and confirm that the button has not been disabled.
The downloaded file looks different.
Open it in the same browser used for the preview and test it at a similar window size. Small differences can come from available fonts, window dimensions, device pixel ratio, graphics hardware, or reduced-motion settings.
My saved design has disappeared.
Browser storage may be removed when you clear site data, use private browsing, change browsers or devices, or run an automatic privacy cleaner. Export a JSON backup when the design is important.
Frequently Asked Questions
Do I need to know WebGL or JavaScript?
No. The controls let you customize the design without editing shader or JavaScript code. Basic HTML knowledge becomes useful when you embed the downloaded result into an existing website.
Does the downloaded hero require an internet connection?
The offline version is designed to include the required dependencies in the downloaded HTML file. Test it by disconnecting from the internet and reopening the file.
Can I customize the text and buttons?
Yes. You can change the brand, eyebrow, headline, accent text, subhead, button labels, colors, and destination URLs. Individual content elements can also be disabled.
Can I use the Builder on a phone?
The editing interface is optimized for desktop use because it displays many controls beside a live preview. Use a desktop or laptop for the best experience.
Is the exported hero responsive?
The design is intended to adapt to different screen sizes, but its final behavior also depends on how it is embedded. Test it at desktop, tablet, and mobile widths before publishing.
Are my design settings uploaded?
The tool is designed to process and store settings in the browser. Exported JSON and HTML files are created on the user’s device.
What is the difference between JSON export and HTML download?
JSON contains the editable design settings and can be imported back into the Builder. HTML is the finished website output used for testing, hosting, or embedding the completed hero.
Can I learn how the shader itself was created?
Yes. The WebGL Shader Background Tutorial explains the underlying development process.
Next Steps
You now have a complete workflow for creating an interactive website hero:
- Open the WebGL hero builder.
- Start with the default example.
- Customize the content and buttons.
- Choose a palette and adjust the motion.
- Select the typography and layout.
- Test the cursor interaction.
- Save the settings as JSON.
- Download and test the offline HTML file.
In Part 2, we will take the downloaded HTML file and add it to WordPress or another website without rebuilding the animation from scratch.
Enjoyed this article?